

February 24, 2019
Dishwasher Repair
If your dishwasher is leaking above the motor at the bottom of the dishwasher, the problem could be any of the pump seals around the part. Order a pump seal kit with replacements for three seals and the drain impeller gasket; the kit is part #675703 for Kenmore dishwashers. Then follow these steps to replace all of the seals and the gasket.
1. Unplug the dishwasher and turn off the water supply.
Any time you’re making adjustments to an appliance, unplug the machine first. During this repair, it’s also a good idea to turn off the water supply to minimize the risk of any leaks or water damage.
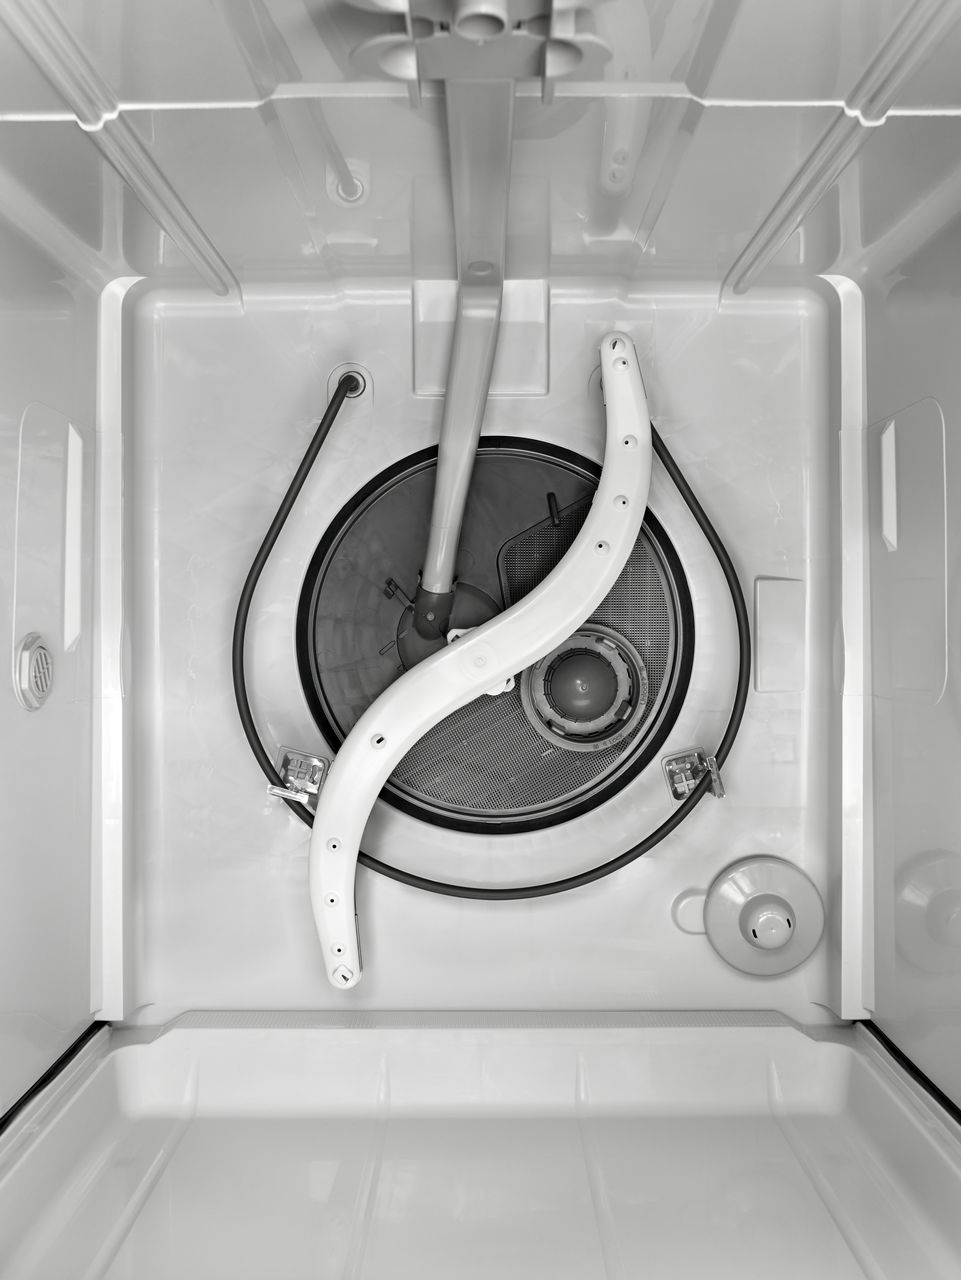
2. Disassemble the bottom of the dishwasher.
“Replacing the pump seal” is really replacing four distinct parts: the drain impeller gasket (the white part in the kit you ordered) and three seals. As you disassemble the dishwasher in this step, you will be removing the old parts as you work your way down to the old gasket.
First, open the door and remove the lower dishrack. Remove the spinning arm. Do this by loosening the central casing above the shaft. Then you can just pull up and remove the lower spray arm. Remove the two central bearings, one on the spray arm assembly and one on the shaft below, too.
Next, remove the eight screws around the outer edge of the pump connector. Then lift it up and carefully pull it free from the supply tube running down back of the machine
3. Prepare the kit for installation.
Pop the holes out of the white gasket and discard the extra material. The kit is universal so it comes with an extra seal. Match up the new seals with the old ones to find which part you don’t need and set it aside.Before you begin reassembling the machine, make sure you know where all three white check balls are.
4. Reassemble the machine as you install the new pump seal parts.
The drain impeller gasket
Orient this part so the main cutout fits around the central shaft and extends towards the edgeless portion of the metal circle below. Press it into place. Make sure the two small, circular cutouts in the gasket fit in place and the part lays flat
The drain cover seal.
Locate the oval drain cover you removed earlier. Take the smaller seal and press it into the oval groove at the bottom of the part. Make sure it’s fully in the housing
Place another check ball into the opening now that it’s taller
The drain cover outlet seal
Find the pump filter assembly you removed earlier. This is the large white circle. Add the final check ball into the opening in the oval directly below the central circle
Tighten it in place with the sealed screw. Remember that you need to hold the impeller in place with pliers as you tighten this screw.
The pump outlet seal
Press the pump outlet seal into the circular groove at the top of the filter assembly. Make sure it sits fully in the housing without pushing up out off the groove or folding
Then plug the dishwasher back in and turn on the water

Apr. 09, 2024
GE Washer Not Spinning? Here’s The Fix!

Apr. 09, 2024
How to Restore Power to Your GE Dishwasher

Apr. 09, 2024
How To Reset Your GE Washer Top Loader

Mar. 06, 2024
Understanding Whirlpool Washer Error Codes

Mar. 06, 2024
JennAir Ice Maker Not Working? Here’s What to Do

Mar. 06, 2024
What to Do If Your LG Fridge Isn’t Cooling

Feb. 05, 2024
Propane vs. Natural Gas Stove: What’s Best?

Feb. 05, 2024
How Hot Does a Dryer Get?

Feb. 05, 2024
LG Dryer Flow Sense: Everything You Need to Know

Jan. 03, 2024
What to Do When Your Freezer Is Not Freezing but the Fridge Is Cold

Jan. 03, 2024
How to Solve Maytag Dishwasher Showing Error F9E1

Jan. 03, 2024
When Is a Microwave Unsafe to Use? (Warning Signs to Look For)

Dec. 11, 2023
How to Fix a Squeaky Dryer (Step-by-Step)

Dec. 11, 2023
How To Remove Ink From Your Dryer

Dec. 11, 2023
How To Fix an LG Microwave Not Heating

Nov. 06, 2023
How To Fix a Maytag Washer Not Spinning

Nov. 06, 2023
KitchenAid Refrigerator Not Making Ice? Here’s Why

Nov. 06, 2023
Whirlpool Microwave Door Error: How to Fix It

Oct. 02, 2023
13 Things to Never Put in the Dishwasher

Oct. 02, 2023
Can You Put Glass in the Microwave?
512 - 819 - 0670Give us a call!