

June 10, 2019
Refrigerator Repair
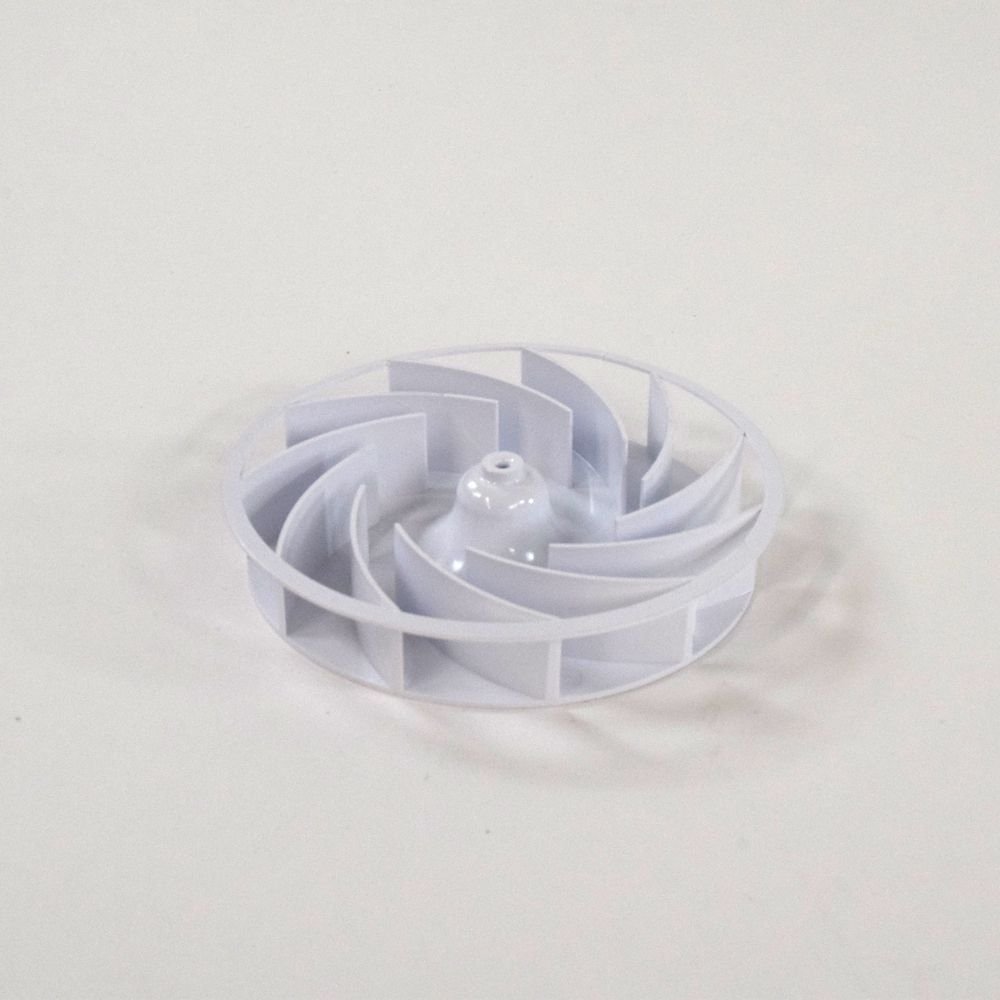
Refrigerators need to keep cold air circulating in order to store your food safely. The fan is the part that keeps the cool air moving so the refrigerator’s fresh food and freezer sections have a consistently low temperature. When the evaporative fan blade breaks or the center breaks free from the evaporator motor shaft, you need to replace it. Order replacement part #DA31-00242A for most Samsung refrigerators. Then follow these steps to replace the part yourself.
1. Unplug your refrigerator.
Before you start making any repairs, unplug the refrigerator. This is an important safety step for every appliance repair job to keep you and the surrounding area safe from electrical discharge.
2. Dismantle the freezer section to access behind the cover panel.
First, open the freezer door and remove the icebox by lifting it up and sliding it out off the rail. Next, start to remove the icemaker. Start by removing the two front screws that hold it to the ceilings. You may need to wiggle it free of the rear retaining clips. But before you pull it out completely, slowly lower it and look for the wiring harness in the back that’s connected to the red wire. Press down the locking tab to unplug the harness. Now you can completely remove the icemaker and set it aside.
After that, remove the corner screws that secure the divider. Also, pull out the divider and set it aside. Then remove the screws under the shelf right below the divider and pull that shelf out. Behind the motor that sits on the shelf is another wire harness. Unplug it before you pull the shelf completely out of the freezer and then set it aside.
Pull out the wire shelves and any baskets. These slide right out once you lift the top edge.
Now you can start to remove the back cover panel. Locate the middle strut with two circular covers. Pop them free with a flathead screwdriver and then remove the screws behind them. Set all of the small parts aside where you won’t lose them.
Then remove the screws around the perimeter that secure the rest of the tall evaporative cover panel. To remove it, start at the bottom and tug it firmly out from the retaining clips. Once it’s loose, you can lift the part out and set it aside. Behind the lower half panel will be the evaporator coils.
Also, remove the top cover panel by removing the three screws arranged in a triangle toward the top of the panel. Use hooking tool to reach behind the panel and press down the locking tabs that sit behind each arrow printed on the cover. Unlike with the lower panel, you can’t just tug the panel free. Be careful to not crack the panel.
Once the panel is loose, pull it out and set it aside.
3. Remove the old fan blade.
Locate the fan at the top left corner behind the access panel. The back of the fan blade’s shaft is usually secured in place with an extra layer of glue. While there are chemicals that can remove it, the best solution is usually to melt the glue loose with a heat gun that won’t damage the area or leave any residue.
Once the glue has melted, you can tug the circular fan blade off of the shaft.
Next, remove the small spring around the center shaft. It will be a tight fit, so you may need to use a flathead screwdriver or your hook to pull it loose. You will add this part onto the shaft of the new fan blade. To install it, just press it into place by hand.
4. Install the new fan blade.
Once the spring has been installed on the new part, it’s ready to install. Orient it so the blades face inward to the back of the freezer section and press the shaft into the cavity in the back of the freezer. Once it’s firmly in place, spin it to make sure it’s not crooked and that there is no resistance.
5. Reassemble the back of the freezer section.
First, install the top panel. To start, orient the cover so the two protruding tabs along the back are at the top. Press those two tabs into the slots near the top edge of the freezer wall. Once you hear them snap into place, then you can continue to press down all of the edges by hand to engage all of the perimeter locking tabs. Next, install the lower back evaporative cover panel. Orient it so the box mechanism is at the bottom. Line up the top edge’s screw holes with the screw holes at the bottom of the top cover panel. Push in the top two corners to make sure those locking tabs are engaged first, and then snap the locking tabs along the edges of the panel.
Now you can secure both panels with the screws you removed earlier. Add back the three screws in the triangle formation at the top of the freezer, and tighten the two longer screws with the metallic finish along the middle strut of the freezer. Also, retighten the two screws near the bottom of the freezer. Make sure they’re snug, but be careful to not crack the plastic. Then cover the middle strut screws with the plastic circular caps.
6. Reassemble the rest of the freezer section.
First, slide all of the wire shelves and any baskets back into place along the rails. Next, orient the shelf with the motor assembly so the plug is in the back left corner. Set it on top of the top shelf and plug in the wire harness. Then set the shelf on the appropriate rail and make sure it’s snugly in position. Secure it with the two screws under the front corners of the shelf.
Install the divider and secure it with a screw on the ceiling. After that, bring in the ice machine. Hold it near the top of the freezer and plug in the wire harness through the cutout along with the ceiling. Snap the two rear brackets into place over the arms in the back of the icemaker so it’s secure but tilts open to the front. Push the front of the icemaker up and add back the two front screws. Then slide the icebox back into place over the icemaker. It should snap into place. Close the door and plug the refrigerator back in. Once it’s had time to equalize the temperature, both sections of the refrigerator should be cold again. For more repair guides or troubleshooting tips, contact us here at Appliance Express.

Apr. 09, 2024
GE Washer Not Spinning? Here’s The Fix!

Apr. 09, 2024
How to Restore Power to Your GE Dishwasher

Apr. 09, 2024
How To Reset Your GE Washer Top Loader

Mar. 06, 2024
Understanding Whirlpool Washer Error Codes

Mar. 06, 2024
JennAir Ice Maker Not Working? Here’s What to Do

Mar. 06, 2024
What to Do If Your LG Fridge Isn’t Cooling

Feb. 05, 2024
Propane vs. Natural Gas Stove: What’s Best?

Feb. 05, 2024
How Hot Does a Dryer Get?

Feb. 05, 2024
LG Dryer Flow Sense: Everything You Need to Know

Jan. 03, 2024
What to Do When Your Freezer Is Not Freezing but the Fridge Is Cold

Jan. 03, 2024
How to Solve Maytag Dishwasher Showing Error F9E1

Jan. 03, 2024
When Is a Microwave Unsafe to Use? (Warning Signs to Look For)

Dec. 11, 2023
How to Fix a Squeaky Dryer (Step-by-Step)

Dec. 11, 2023
How To Remove Ink From Your Dryer

Dec. 11, 2023
How To Fix an LG Microwave Not Heating

Nov. 06, 2023
How To Fix a Maytag Washer Not Spinning

Nov. 06, 2023
KitchenAid Refrigerator Not Making Ice? Here’s Why

Nov. 06, 2023
Whirlpool Microwave Door Error: How to Fix It

Oct. 02, 2023
13 Things to Never Put in the Dishwasher

Oct. 02, 2023
Can You Put Glass in the Microwave?
512 - 819 - 0670Give us a call!