

March 21, 2018
Dryer Repair
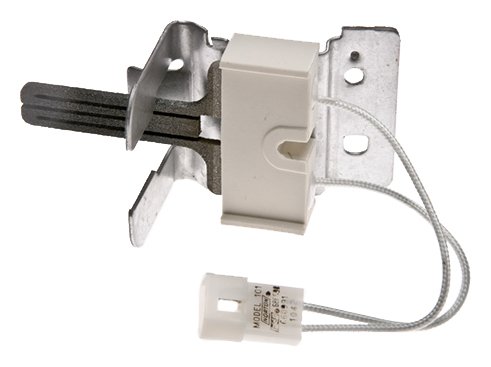
If your dryer isn’t heating up, the igniter could be at fault. These parts are very fragile and break easily. Order a replacement igniter (part #279311 for Whirlpool dryers) and follow these steps to replace it.
How to Access the Igniter
1. Unplug the dryer and turn off the circuit breaker.
This is a necessary first step before any repair or part replacement. Because this repair involves disconnecting electrical parts, it’s even more important that you separate the appliance from its power source.
2. Remove the top cover.
Remove the two screws along the dryer lint lid. Then use a putty knife or pry along the front edge to pry the top free. The tabs are approximately two inches inside the front corners. Then swing the top panel back and away.
3. Remove the front panel.
Use a screwdriver to pry the door’s wire harness free. It is located at the front right corner. Next, loosen two interior screws (one in each front corner). Then pull the front panel forward about 15 degrees so you can pull it up and away from the bottom supports.
4. Remove the tub for more access.
Along the bottom of the machine (under the tub), you will see where the belt runs through the idler pulley and the motor. Pull the belt away from the motor and out of the pulley.
Use the loose belt as a handle to remove the drum from the dryer.
How to Replace the Broken Igniter.
1. Remove the igniter assembly.
Remove the screw next to the burner tube. Next, pull the igniter assembly out of its place without pulling it entirely free; it will still be connected to the dryer through a wire harness. Disconnect the wire harness with the flat head screwdriver. The igniter assembly is composed of a bracket, the igniter, and a screw holding the two together. You will be reusing the bracket, so loosen the screw and set it aside. Pull the igniter free.
2. Replace the part.
Put the new igniter in place and tighten it against the bracket with the screw.
Carefully insert the assembly in the burner tube. Remember the gray top of the igniter is very fragile and breaks with even light impact.
3. Reassemble the parts near the burner tube.
Retighten the screw holding the assembly next to the burner tube. Then connect the wire harness.
4. Reassemble the machine.
Carefully lift the drum back into position by the belt. Set it on the roller wheels without hitting the felt. Roll the drum a few times to make sure the felt is fully in position without any folds or pinches. Next, place the loose length of the belt back around the pulley. To do this part, you will need to lift up the idler pulley and apply continuous pressure as you loop the belt through the pulley and put it back over the motor.
5. Reattach the panels.
Put the front panel in place against the bottom supports. Align the panel with the drum’s front seals and then push it flush with the front of the machine. Retighten the screws and reattach the wire harness.
Flip the front panel back into position and snap it into place with the front tabs. Then retighten the screws in the lint trap.
For more part replacement procedures and appliance repair tips, go to Appliance Express.

Apr. 09, 2024
GE Washer Not Spinning? Here’s The Fix!

Apr. 09, 2024
How to Restore Power to Your GE Dishwasher

Apr. 09, 2024
How To Reset Your GE Washer Top Loader

Mar. 06, 2024
Understanding Whirlpool Washer Error Codes

Mar. 06, 2024
JennAir Ice Maker Not Working? Here’s What to Do

Mar. 06, 2024
What to Do If Your LG Fridge Isn’t Cooling

Feb. 05, 2024
Propane vs. Natural Gas Stove: What’s Best?

Feb. 05, 2024
How Hot Does a Dryer Get?

Feb. 05, 2024
LG Dryer Flow Sense: Everything You Need to Know

Jan. 03, 2024
What to Do When Your Freezer Is Not Freezing but the Fridge Is Cold

Jan. 03, 2024
How to Solve Maytag Dishwasher Showing Error F9E1

Jan. 03, 2024
When Is a Microwave Unsafe to Use? (Warning Signs to Look For)

Dec. 11, 2023
How to Fix a Squeaky Dryer (Step-by-Step)

Dec. 11, 2023
How To Remove Ink From Your Dryer

Dec. 11, 2023
How To Fix an LG Microwave Not Heating

Nov. 06, 2023
How To Fix a Maytag Washer Not Spinning

Nov. 06, 2023
KitchenAid Refrigerator Not Making Ice? Here’s Why

Nov. 06, 2023
Whirlpool Microwave Door Error: How to Fix It

Oct. 02, 2023
13 Things to Never Put in the Dishwasher

Oct. 02, 2023
Can You Put Glass in the Microwave?
512 - 819 - 0670Give us a call!